My camera: These days I shoot with an inexpensive point and shoot. I don't want to spend a ton of money on a camera. I tend to be hard on cameras, so I go cheap. My current camera is a Canon Powershot Elph 320. It is a 16mp camera with a few features I use a lot. It is small, durable and pink. Best of all, I got it for $70. I hate the touch screen. I leave it locked almost all the time. I'll be happy when it breaks.
What features do I like? Biggest for me is that there are simple, non-fiddly ways of accessing the controls on the camera so I don't have to look at it in order to turn it on, change settings and shoot. My eyes and attention needs to be on where I'm riding rather than fiddling with the camera. I change all the settings on the camera by feel rather than by site. The best camera I ever used was the Canon Powershot S100. It was AWESOME, but it wasn't perfect. The jog dial was great for adjusting exposure on the fly, but it required that I look at the camera to see if I'd changed a setting. I couldn't do it by feel.
I like shooting with a cheaper camera. The photos are not as spectacular, but I worry much less about the camera, so I'm more brave when shooting and get much better photos as a result. I am not worrying about destroying a $70 camera near as much as I am a $400 one. Don't get me wrong... I love shooting with great cameras. I just am much more reserved in how I shoot and that is somewhat limiting for me. If I'm shooting like Evel Kneivel, I want to be carrying a cheap, durable camera.
How do I set up the camera?
Holding the camera is important. I put skateboard grip tape on every flat surface that my hand touches. Fully 1/4 of my camera is covered in grip tape. 4 of the 6 sides of the camera have grip tape on them. Cameras are slippery. Doing this reduces the chance that you'll drop your camera.
Settings: leave the camera in Program mode with burst set. Auto ISO and Auto White Balance. The first month I have the camera, I figure out if I need to adjust the exposure before I shoot. My current Canon meters the photos with a little too much light, so I dial back the exposure 1/3 or so to compensate. I like the camera because it has a switch with two settings… one for full auto and one for program. If I know I need a fill flash, I set it for full auto (which I set to always fire the flash). That gives me a way to turn flash on and off with the touch of a finger… I don't have to look.
If light is going to be consistent during the ride, I may switch to Aperture Priority mode and set it to the sweet spot for the lens. F8 is pretty good for the little camera that I've got. That gives me a little different kind of shot than letting the computer figure everything out.
How do I carry it? I have a small camera bag that I attach to the handlebars or head tube of the bike. It has a velcro flap that completely covers the camera and keeps sweat, mud and light rain off when the camera is stowed. My favorite is the Mountainsmith Cyber II Camera Case. I not only velcro it to the bars, but I also either zip tie or velcro one of the D-rings to the bars. I've had the main velcro straps fail on bumpy trails.
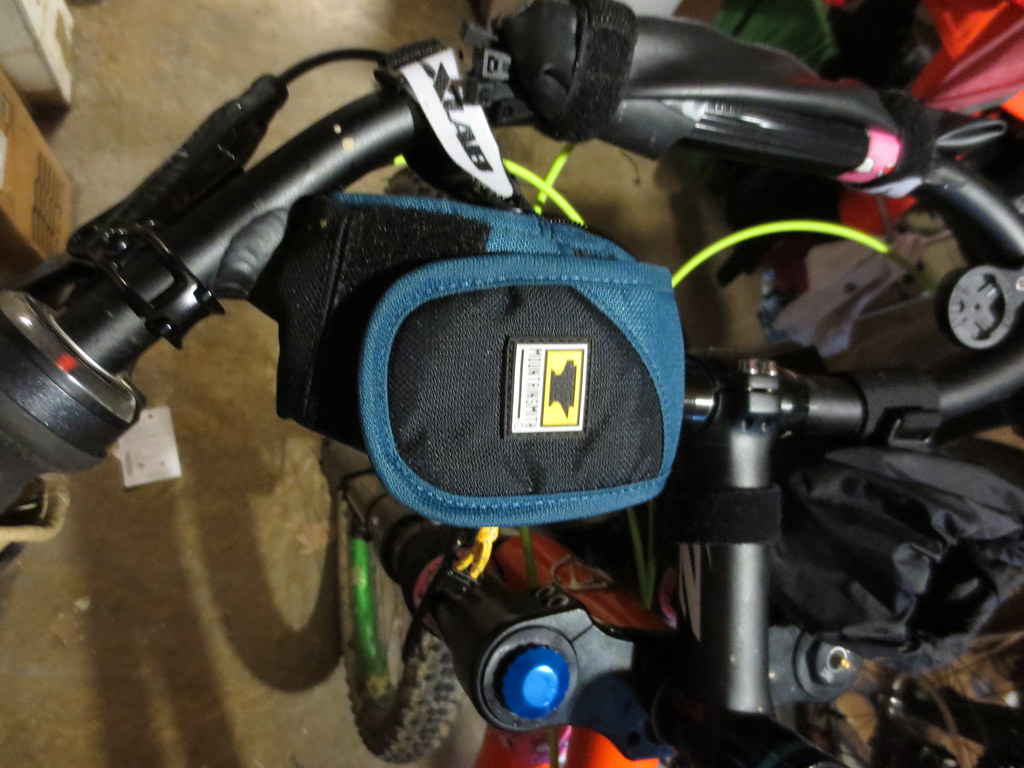
Camera bag on the bars of the tandem
On rainy days, I usually put the camera in a waterproof pocket on my rain jacket. All of my rain gear has waterproof pockets on them. They're not perfect, but my cameras are tough enough that they can get a bit moist.
Sweat is something you want to avoid getting in your camera. If your name is Sean Chisham, buy the toughest waterproof camera you can, completely baby it and replace it every year. You're gonna kill the dang thing, so shoot a lot before it dies. ;)
Using the camera while rolling: Step 1: slip my hand into the camera lanyard. Step 2: remove camera from case. Step 3: turn it on. Step 4: Shoot. Step 5: Turn camera off. Step 6: Stow camera. Step 7: Remove hand from camera lanyard. The camera is attached to my wrist the entire time it is out of the case. It is much less likely to get dropped.
Framing the photo: Use burst mode! Play with it. Shoot from down low. Shoot from up high. Try to avoid weird backgrounds. Try to include weird backgrounds. Get people making funny faces while eating. Take photos of yourself. Shoot forward, backward, up, down, sideways. If there was a way to shoot inside out, I probably would try that. Use burst mode! Throw away 99% of your photos.
Buy this book and read the chapters on composition. Learn the 7 rules and practice them. You will become a much better photographer. http://www.amazon.com/Kodak-Guide-35mm-Photography-Techniques/dp/087985801X Who cares if it is about 35mm photography. Read it. You'll learn about light, aperture, shutter, composition... etc. You'll stop taking snapshots and you'll start taking photographs.
PRACTICE PRACTICE PRACTICE!! Play. Have fun. Find your eye. Practice one kind of photo for a while until you figure it out and get good at it. Then move on and try something different until you get good at that. Shoot EVERY DAY!!! Use burst mode. SHOT EVERY DAY! Join a photo group that pushes you and inspires you. Bike180 on Flickr is a good choice. SHOOT EVERY DAY!!!
Please let me know if you have questions or if there's something that works well for you.
Hugs and kisses
Pete
You can find me on Flickr here: http://www.flickr.com/photos/pedrogringo/
ReplyDelete